Input and Output Devices for Physically Challenged Users


The ever-increasing presence of computers in everyone’s lives has generated an awareness of the need to address computing requirements for those who have or may develop physical limitations. The Americans with Disabilities Act (ADA) requires any company with 15 or more employees to make reasonable attempts to accommodate the needs of physically challenged workers.
Visually impaired users or blind users
- can change Windows settings, such as increasing the size
- changing the color of the text to make the words easier to read
- can work with voice output (that is, the computer reads the information that appears on the screen
- a Braille printer, which outputs information on paper in Braille
Hearing-impaired users
- can instruct programs to display words instead of sounds
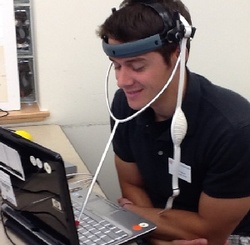
Users with limited hand mobility
- Keyboards with larger keys are available
- using the on-screen keyboard, in which a graphic of a standard keyboard is displayed on the user’s screen
- head-mounted pointer to control the pointer or insertion point
Companies on the Cutting Edge

Bracken Darrell, CEO of Logitech
|
|
HP (Hardware and Software Products Leader)
One of the more famous real estate parcels in the United States is the birthplace of the Silicon Valley:the garage where Stanford University friends William Hewlett and David Packard developed various electronic products. Their first success in 1938 was an oscillator used to test sound equipment.
Today HP (Hewlett-Packard) has become the world’s top manufacturer of ink-jet and laser printers,multifunction peripherals, desktop and notebook computers, and servers. It also is a leading software company with products for networking and storage management. |

Meg Whitman, CEO of HP
|
Technology Trailblazers

|
|
|

|
Digital Video Technology
|
Digital video technology allows you to input, edit, manage, publish, and share your videos using a personal computer. With digital video technology, you can transform home videos into Hollywood-style movies by enhancing the videos with scrolling titles and transitions, cutting out or adding scenes, and adding background music and voice-over narration.
The following sections outline the steps involved in the process of using digital video technology:
1) Select a Video Camera Video cameras record in either analog or digital format. Analog formats include 8mm, Hi8, VHS-C, and Super VHS-C. Digital formats include Mini-DV, MICROMV, Digital8, DVD, Blu-ray, and HDV (high- definition video format). A video recorded in high definition can be played back on a high definition display. Digital video cameras provide more features than analog video cameras, such as a higher level of zoom, better sound, or greater control over color and lighting. 2) Record a Video
Most video cameras provide you with a choice of recording programs, which sometimes are called automatic settings. Each recording program includes a different combination of camera settings, so that you can adjust the exposure and other functions to match the recording environment. Example, if you are shooting outside on a windy day, then you can enable the windscreen to prevent wind noise. If you are shooting home videos or video meant for a Web site, then the point-and-shoot recording program is sufficient. 3) Transfer and Manage Videos
After recording the video, the next step is to transfer the video to your personal computer or to the Internet. Most video cameras connect directly to a USB or FireWire port on a personal computer. Transferring video with a digital camera or mobile device is easy, because the video already is in a digital format that the computer can recognize. When transferring video, the software may allow you to choose a file format and a codec to store the video. A video file format holds the video information in a manner specified by a vendor, such as Apple or Microsoft. The 3GP format is widely used on mobile devices. File formats support codecs to encode the audio and video into the file formats. A codec specifies how the audio and video is compressed and stored within the file. |
4) Edit a Video
Once the video is stored on your hard disk or the Internet, the next step is to edit, or manipulate, the video. The first step in the editing process is to split the video into smaller pieces, or scenes, that you can manipulate more easily. This process is called splitting. After splitting, you should delete unwanted scenes or portions of scenes. This process is called pruning. After creating the scenes you want to use in the final production, you edit each individual scene. The next step in editing a video is to add audio effects, including voice-over narration and background music. The final step in editing a video is to combine the scenes into a complete video. This process involves ordering scenes and adding transition effects between scenes. Video editing software allows you to combine scenes and separate each scene with a transition. 5) Distribute the Video
After editing the video, the final step is to distribute it or save it on an appropriate medium. You can save video in a variety of formats. Optical disc creation software, which often is packaged with video editing software, allows you to create, or m aster, optical discs. You can add interactivity to your optical disc creations. You also can save your video creation in electronic format for distribution over the Web, via e-mail, or to a mobile device. After creating your final video for distribution or for your personal video collection, you should back up the final video file. You can save your scenes for inclusion in other video creations or create new masters using different effects, transitions, and ordering of scenes. |
